Tuesday, July 30, 2013

Sideways Chevrons

I know I've been a little MIA the past two weeks, I was in Florida (at Universal) then I was visiting my mom for a week. She just moved so we're sorting out the house and unpacking! I was only able to paint my nails twice but I got a lot of new polish, you can see the picture on my instagram, @nailsbynatasha

This mani, like my first chevron mani, is inspired by @nailsofjessiek. I love how the slightly sideways placement of the tape just gives the mani a bit of a different look compared to traditional horizontal chevrons. 

Below are the polishes I used to create this look. 

Orly - First Kiss, China Glaze - Seduce Me
I started with three coats of First Kiss. I was going to use saran wrap to sponge some of Seduce Me onto my thumb, pointer, and pinky fingers but I didn't like how it turned out so I covered it with two coats. 


Here is my finished product. I took a couple tries to place the tape properly. At first I had it on a 45 degree angle but I didn't like that so I flattened it out a tad. I used two coats of Seduce Me on top of the tape. I put one top coat on, smoothed it down with a buffer and put another top coat on just so it wasn't super bumpy. 


I like how this is a spin on the classic horizontal chevrons, but I just feel like it's missing something. Like I mentioned earlier I wanted to do saran wrap nails on my thumb, pointer, and pinky fingers but I need more practice. I love the look of a nude and a contrasting colour for the chevrons though! I think this is something I'll do on my mom or one of my sisters soon. 

XO Natasha 
Sunday, July 28, 2013

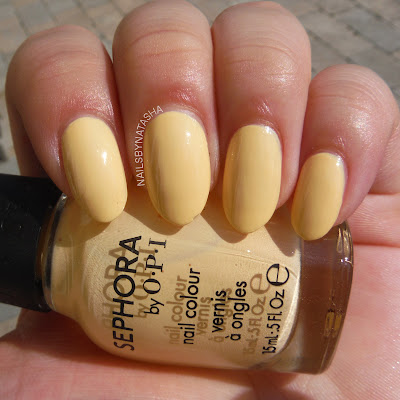
Untried: SOPI - Why Yellow There...

I got this polish at Winners for $5 or $6 and I've never seen SOPI there before so I was super excited! They had a couple other colours but none that I liked. This light muted yellow is really pretty for spring and summer if you like colour coordinating. It's also a very nice accent colour that goes well with most outfits. 


The formula was pretty nice, I used 3 thin coats for full opacity. You could probably get away with 2 thicker ones though. 

This polish reminds me of China Glaze - Lemon Fizz. Here is a comparison of the two polishes: 


Both these polishes dry differently than their bottle colour, but Lemon Fizz is definitely a little brighter, while Why Yellow There is a little more muted. I love both! 


XO Natasha 

Wednesday, July 10, 2013

First Chevrons

I've always been familiar with pinking shears because my mom loves to sew. It wasn't until I started looking at manicures on Instagram that I realized what you could actually do with tape. I'm not sure whose nails I saw first, but when I think of chevrons, I instantly think of @nailsofjessiek on Instagram. She is the QUEEN of chevrons! Click here to visit her blog. 

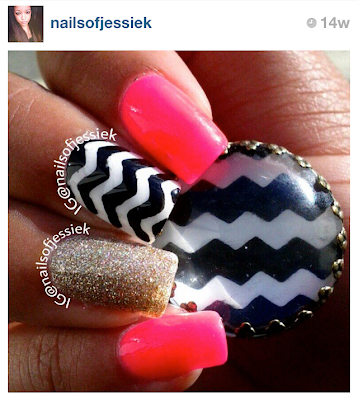
I wanted to start out with a really simple chevron so just in case I messed it up, not all of my nails would be ugly. Here's a picture of Jessie's manicure that I recreated. 

Screenshot from Instagram, credit to @nailsofjessiek
Here are my pinking shears, or zig zag scissors. I ordered these from eBay for roughly $7USD. Click here to view the page for them if you would like to purchase some for yourself. The reason I bought these on eBay was because I couldn't find any at Walmart, and I didn't want to bother going to any craft stores because my mom told me they would be expensive. (Who has money these days?! Not me that's for sure!) And being the eBay fanatic that I am, I knew I could find some for a great price! To me, it's worth the wait for cheap items. 


The most important thing when using tape for a mani is your scissors. If they're not sharp, you won't have crisp edges. Also, good quality tape is a must, of course. I use Scotch tape. One tip I learned from reading Jessie's Chevron Tutorial post is that you should double up your tape. This will prevent the tape from ripping as you peel it off. My first attempt at the chevrons was unsuccessful because of this. I also thought the pieces of tape were too big so I cut smaller ones for my second attempt which was successful! Here's the tape on my nail. 


Below are the polishes I used for my mani. 


OPI - Black Onyx, OPI - Alpine Snow, OPI - ElePhantastic Pink, NOPI - The Next CEO, Pure Ice - Bare It All

And here is the finished product! I'm SO happy with how it turned out. I really understand why people are obsessed with Chevrons now. They're just so crisp and unique, your eyes are just really drawn to them. 


I'm really excited to create more chevron manis especially since it's so easy! Once I the hang of cutting the tape everything went so fast. 

XO Natasha 

Saturday, July 06, 2013

Classy Glitter Gradient

If you read my posts or follow me on Instagram you'll know I really looove glitter gradients. Why? They're just so much quicker and easier to do than blending two colours together. It's a little tricky to master a glitter gradient because most people tend to go overboard. By that I mean too much glitter (yes, in this case, there is such a thing as too much glitter!). It just doesn't blend properly so you end up with basically two chunks of colour. Well, colour and glitter. 

I recently purchased OPI - Which is Witch? and it is SO beautiful I just had to force myself to use it. I tend to try to "preserve" or "save" pretty polishes... weird I know. I wanted to incorporate another untried so I figured I'd go with Essie - Bahama Mama to achieve a more elegant or classy look. It's not very summery, but it sure is pretty! I've never really been one to wear season appropriate manis anyway. 

Essie - Bahama Mama, OPI - Which is Witch?


I used three coats of Bahama Mama for full opacity. Not sure why my pointer finger looks darker, but this is without top coat. It's more purple in the light and fairly dark IRL. 


And here's the glitter gradient using Which is Witch?. I really love how this turned out! I'm even thinking of using this same glitter for my next mani! I don't remember the last time I did the same thing or used the same polish two manis in a row... 


I also really wanna try this in a jelly sandwich. I don't want to cover up all the beautiful holo but the glitter is so unique - hex, bar and micro - that I think it would look amazing! 

XO Natasha 

Friday, July 05, 2013

Sideways Neon Gradient

I always have a hard time deciding what to do on my nails, but I was scrolling through Instagram and was reminded of a beautiful gradient @sparrownails did a while ago. It was a sideways gradient using a light blue and a light purple, topped off with fairy dust. I wanted something a little brighter, so I chose two neons.


China Glaze - Pool Party, China Glaze - Orange Knockout, China Glaze - Fairy Dust
I sponged 2-3 coats of polish over two coats of white polish. My camera doesn't like neons too much, so I used my phone for the last picture. The colours don't look as bright on my phone but you can see the colour better. 


I really like how fairy dust ties a gradient together - it kind of blends it and hides any imperfections from sponging! Sorry for the messiness and shrinkage around my cuticles, I'm sure if you own China Glaze polishes and Seche Vite you know these two aren't best friends. 

There are a lot of different ways to do a gradient using a sponge, but I've found my method works quite well. I get the sponge wet first so the polish doesn't absorb too far into it. Then I paint polish onto the sponge and sponge my nails. I find sponging requires 3-4 coats to really be opaque. I know it uses a lot of polish but the results are so pretty :) If I'm doing a bit of a lighter gradient, or only sponging one colour as opposed to two or three, I put dabs of polish on a piece of glass and dab that with the sponge. 

XO Natasha 

Wednesday, July 03, 2013

China Glaze - Too Yacht To Handle


Today I have a swatch/review of Too Yacht To Handle from the China Glaze Sunsational collection for summer 2013. When I saw a picture of the bottle and some swatches, I thought it was very similar to Color Club - Blue-ming. But, as more people posted their swatches and reviews I learned it was like a brighter version of For Audrey and Aquadelic. Here is a comparison of the three polishes. They're all a little brighter IRL. 

Color Club - Blue-ming, China Glaze - Too Yacht To Handle, China Glaze - Aquadelic
While this colour is absolutely beautiful and definitely perfect for summer, the formula was  awful. I put one coat on and didn't think it was too bad, but after a second and third coat I realized that yes, this formula is just terrible. Even with three coats in the pictures below, there are still some bald spots because this polish is extremely prone to pulling. For best results I would recommend many extremely thin, smooth coats. Even then you'll probably have a hard time so you'll most likely have to dab extra polish on any bald spots, and finish with a nice self levelling top coat like Seche Vite. 


This polish is probably best for nail art, as opposed to being used over the whole nail. I'm picturing it as leopard spots or stripes! 

One other thing I really disliked about this polish is how prone to chipping it is. I know China Glaze tends to chip fairly easily but I always cap my tips and even then this polish chipped after a couple hours. I even put a second top coat on my thumb and that didn't help. Now, after one full day of wearing it there's larger chips at the sides of my nails where the free edge begins, and there's no reason for my nails to be chipping already, I did nothing all day. 

XO Natasha