Friday, March 29, 2013

Easter Nails

I was so so so excited to finally be able to do Easter nails! I didn't really do anything for New Years or Valentine's Day, and I don't like green so although my St. Patrick's Day nails were pretty cool I took them off the next day. 

When I think of Easter I think of mini eggs! I love how pastels look together so I knew I could do something really pretty. Since filing my nails into almonds I've come to realize it's an awful shape for a LOT of designs. Lines or anything geometrical especially. It's really annoying :( BUT... they are the PERFECT SHAPE FOR EASTER EGGS! So naturally that's what I had to do. I really wanted a random assortment of egg designs and colours, so I picked 5 Easter colours and planned out my eggs on paper. 

I really love how my Easter eggs turned out. Each one is a different colour, with a different pattern of lines, zigzags and dots. These nails look even cooler from far away! Well, when I stick my hands out and admire them. 


Polishes used:
Blue: Orly - Snowcone, Yellow: Sally Hansen - Mellow Yellow, Purple: Essie - Playdate, Turquoise: China Glaze - Aquadelic, Pink: Orly - Cotton Candy


After I planned out my Easter eggs I saw a picture of little chicks in eggs! I thought that was adorable so I decided I'd do it on my right hand. I also love how these turned out! They're so cute! I don't have many yellow polishes so I was a little worried the chicks would look a little odd but the yellow I used dried darker and it ended up looking even better than in the bottle. I forgot to bring black and orange polishes to my mom's so thankfully her and my sister had some! 

Polishes used: 
Yellow: Sally Hansen - Lightening, Black: Wet 'n' Wild - Black, Orange: NYC - 112A (don't know the name) 


To create all the designs I used my dotting tools. I put two coats of Seche Vite on because the designs made my nails a bit bumpy. 

XO Natasha 

Saturday, March 23, 2013

Quo by Orly - Prepster


I just wanted to do a really quick review on a new polish my mom bought me because I LOVE it! Lately I've really been going crazy for all sorts of blue polishes, and I didn't even think I liked blue! Apparently I do... This one caught my eye when I went into Shoppers Drug Mart. There were a couple other Quo polishes I liked but this one was absolutely gorgeous! Quo makes their own makeup but for their polish, it's by Orly. 

I do love Orly polishes and the formula and application was typical Orly. My only concern was the brush. It was cut evenly but at least 3 bristles came out as I was applying this polish! Talk about annoying! Like I said the formula and application were good. This polish is a little on the sheer side so it took 3 coats + an extra tip coat and you can still see some VNL. I don't really mind, because for the most part it's opaque, you only see the VNL in some lighting. 

The main reason I love this polish is because it's so unique. It stood out to me the first time I saw it but I fell even more in love with it when I put it on. This polish is so unique because it's a totally different colour depending on the lighting, and it photographs differently than it looks as well! I wish I could have gotten a couple pictures in my light box but I never got around to it. Sometimes this polish looks really dull and minty. Sometimes it looks teal - someone even told me it looks like a Tiffany blue. And sometimes it's just really bright blue. There's also a subtle shimmer in this polish which just makes it even prettier! It's so subtle and I wasn't sure I liked it at first but this polish wouldn't be the same without it. 

On top of being a pretty colour it's perfect for spring! Very light yet still fairly bold. As previously mentioned my only concern with this polish is the brush, but I think I just got a bad one. I'd like to try layering this polish over white & black to see how it looks! 

XO Natasha 
Saturday, March 16, 2013

St. Patrick's Day Nails

I didn't get a chance to do Valentine's Day nails last month so I really wanted to make sure I did something for St. Patrick's Day. I'm not too fond of green but I figured if I paired it with gold it wouldn't be so bad!


On all my fingers I used NOPI - The Next CEO for the base. Then I put NOPI - Disco Dolls on top. The green was a random brand, Bare Elements - Emerald Green.

I used binder reinforcers to create the half moons on my thumb, ring, and pinky, and I (attempted) a watermarble on my first and middle fingers. I really like how half moons look on my almond shaped nails! But I know I really need to work on my watermarble technique. Corynn Musser (@mucking_fusser) has the BEST watermarbles I've ever seen so next time I try I'm following her tutorial exactly. The watermarble looks more like it's supposed to on my left hand (first picture) however the colours are stronger on my right hand (second picture).


This mani didn't turn out half bad but I'm excited to be able to take it off after tomorrow. I really loved Disco Dolls though, I think it's a gorgeous gold with some copper tones and the medium multi coloured hex make this polish very unique.

Hope you all have a great St. Patrick's Day!

XO Natasha

Tuesday, March 12, 2013

NOTD: Jelly Sandwich


This is my first real attempt at a jelly sandwich, and I'm pretty happy with how it turned out. There's only a couple things I want to change for next time. 

First, I want to use a different base colour. For this one, I used a very light mint base from Love & Beauty and I think with the pink jelly on top it looks very grey. I'd like to use either the same jelly for the base but I also want to experiment with blue and purple bases.

Second, I want to use more glitter. I wanted to keep this mani very light and simple, and I do like how it looks but I think it would look even better with more glitter! 

To do this exact mani I used a coat of strengthener for the base coat. Then I put on two coats of an unnamed Love & Beauty polish (Forever 21). Next I used one coat of Tryst Lacquers - Sweet nothings (shop link here) topped off with two coats of Essie - Sugar Daddy and a coat of Seche Vite. 

You may  notice I filed my nails into almonds! The ManicureAddict was my inspiration for this, I absolutely adore her nail shape! I also have a black backdrop in my light box. I've heard it makes lighter and neon colours stand out more, whereas a white backdrop is better for darker, bolder colours. 


I'm curious, what are your go to jelly sandwich polishes? Base, glitter & jelly top coat?

XO Natasha

Saturday, March 09, 2013

Weaved Lines & Gradient

You may have noticed it's been quite a while since I've done some real nail art, so I figured hey, it's Saturday, I should do something cool with my nails! (I was supposed to be studying today but instead I did my nails and cleaned my room... still fairly productive I think!) 


I'm gonna call this look weaved lines.Iit's kind of like doing a braid on your nails but instead of using different colours you just use lines overtop of a base colour. I've been seeing this a lot on Instagram lately, and I have a couple pictures in my phone with this look as well. It seemed simple enough so I figured I'd give it a try! 

I also wanted to practice my gradient technique since I've tried a couple times with very little luck. I figured it if turned out terrible the lines would cover it up. I used two pinks to do my gradient and it's very subtle, and even more subtle in the pictures so for that I apologize. It turned out really good though! I'm very pleased and for my next mani I'll probably do a gradient on all my nails. It's time consuming and uses more polish than most designs but it's a really pretty look! I'll be posing a tutorial soon, or maybe I'll make a video, just with my own tips because it took me a couple tries to get a decent look so I'd like to share how I did it! 

The grey I used is Orly - Decoded. The darker pink is Orly - Cotton Candy, and the lighter pink is Maybelline Color Show - Born With It. I used Seche Vite for the top coat. I just got my Seche Vite a week ago and I love it! It dries so fast and leaves your nails so shiny. 


I know my lines aren't straight and aren't the same size... for some reason I was really shaky today although I'm usually very still! I really like this look but next time I think I'll try doing more of a weave as opposed to the top part being "weaved" and the bottom just with vertical lines. 

XO Natasha 

Friday, March 08, 2013

Zoya - Aurora

As soon as I saw a picture of this polish I knew I had to have it! Apparently so did everybody else, because while I was patiently waiting for mine to arrive, I noticed almost everyone posting swatches of it. 


Everyone said it's impossible to photograph this polish, and they are indeed correct. I've taken some different pictures of this polish so you can see the full effect, but even these pictures combined wouldn't do it justice. The polish is lighter IRL than in any of the pictures, simply because it has so much holo/glitter in it. And you can't tell in the pictures, but the holo is quite linear, more than I thought it would be. 


With flash, you can see just how much glitter is jam packed into this polish! It looks very speckled in the picture, but it's not as obvious IRL. 


Here are two pictures, both out of focus so you can see how much holo the polish really has. Still quite hard to capture but you can see it better in the bottle than on my nails. 

So we've already established how beautiful this polish LOOKS, but let me tell you about the application. I found this polish's formula extremely thick for Zoya which is really annoying, but it applied quite smoothly. Despite looking quite "dense", it's got a semi jelly finish so it took 3 thin coats to make it opaque. One thing I really like about this polish though is the fact that the holo glitter is tiny flakes as opposed to hex or square pieces. It makes the polish look a little more rustic and I just get a more natural feel since the shapes are very irregular. I didn't notice this until a day after I put the polish on, so if you're not a big fan of flakies, you don't have to worry about seeing them unless you look up close or do macro shots. 

This beauty is a must have in my opinion. It's a beautiful shade of purple to begin with, but with the teeny holo flakes, this colour just comes alive. 

Does anyone own own Blaze or Storm? I'm considering getting them since I love Aurora so much. 

XO Natashaa

Saturday, March 02, 2013

Zoya Lovely Collection - Spring 2013

Zoya's Lovely collection for Spring 2013 consists of 6 beautiful polishes - 3 shimmers and 3 cremes. I had been lusting over this collection for a couple months before it was finally available on NPC. I was most excited for Jacqueline and Blu, but I ended up loving the whole collection! 


The three shimmers are Piaf, Gie Gie, and Julie. 

The three cremes are Blu, Neely, and Jacqueline. 


Piaf is a light and subtle mustard colour with very pretty shimmer in it. Colours in the yellow family tend to look awful against my Asian-yellow undertoned skin, but I don't mind this one. I like it much better on than in the bottle and I'm considering wearing this some time! The formula was great as always. This is two thin coats and you can see some VNL but if you did one half coat just at the tips the problem would be gone. 


Gei Gei is a really pretty light pink. There are already so many pinks like this one, with and without shimmer so I don't find this colour too unique, but it fits in perfectly with the whole collection. Formula was great again, and to fix the VNL you'll probably need three coats of this polish plus maybe one more just at the tips. 


This gorgeous light purple is called Julie. I don't have anything else like it and I was instantly in love with it when I put it on. It's bright yet fairly subtle and soft, and the slight shimmer really just makes it prettier. Formula was great like Piaf and Gei Gei. I found that of the three shimmers, Julie had the best coverage. Shown below is two coats with minimum VNL. 


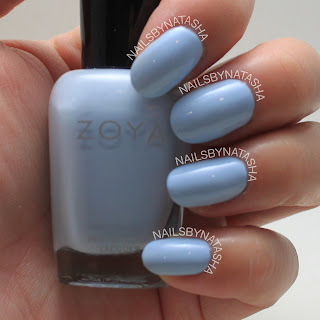
Blu is a very light blue. Compared to a couple other blues I have, this one has undertones of purple, making it a teeny bit like a super white washed periwinkle! I find the intense white undertone is a little harsh, although I personally don't mind it. I love this one! It was the polish I was most excited for when I bought the Lovely collection. Application was good, a little thicker than normal cremes and not too smooth but a good top coat will fix any problems. I used two coats for the photo below to achieve full opacity. 


Neely is a great mint colour. I love this one because it's a little deeper and bolder than most mints which are really light and pale. This colour feels whole and it's got a little essence of OPI - Mermaid Tears. I don't own that polish but I've seen so many pictures that I know what it looks like. Application wasn't as good as the three shimmers, but it was typical for a creme polish. Shown below is two coats to achieve full opacity. 


Of the whole Lovely collection, this is the polish that caught my attention the most simply because of the name - it's my youngest sister's name! I've also really been into neutrals lately so I really liked this one. It's neutral, but not enough so that it just blends into your skin. I don't really know how to describe the colour, Zoya says it's a peach undertone. This one is way prettier in person and I'm glad I got it! Application was good, two coats are shown below for full opacity. 


What are your favourite polishes from this collection? I don't think I can pick one... or two... or three... I have to pick four! I like Julie, Blu, Neely and Jacqueline best. I do also like Piaf and Gei Gei, but Piaf isn't my first choice for polish colour at all, and I didn't find anything too special about Gei Gei that makes it stand out from other light pink polishes I have. 

Happy Polishing! 

XO Natasha