Sunday, June 23, 2013

Summer Floral

I've really been into floral lately, but I haven't actually gotten around to doing floral nail art. It all just looks so beautiful but a little more time consuming than I wanted. But, I figured I would do it because my last mani was meant to be a palette cleanser. 

I started with a base coat of Nail Envy, of course. Then I decided to use one of my new polishes, Essie - Tart Deco. It's a beautiful peachy coral creme. I got it at Shoppers Drug Mart for $6.99, yay for sales! (Essie is usually $11.99 at the drug store and $9.99 at Walmart.) Tart Deco dried a little darker than in the bottle but I still love it. I decided to do purple flowers because I think they look great with peachy colours. I used white for my lines and dots because, well, isn't that the classic floral mani? 

Essie - Tart Deco, unnamed Love & Beauty, Essie - Playdate, Beauty Treats - White, Zoya - Midori 

I used a dotting tool for the dots, and a thin brush I bought on eBay for the stripes. 


For the flowers I used a few different sized dotting tools. To see a video tutorial on this flower technique I learned from trendypolish on Instagram, click here. Her flowers are a little bigger than mine, and so are the leaves. These flowers are so easy and pretty, you have to give them a try if you love floral :) 


After seeing how easy floral really is, I'm definitely going to be trying a lot more of it! 

XO Natasha 

Thursday, June 20, 2013

One Love Lacquers


I bought these polishes FOREVER ago and I never got around to swatching them! When I finally swatched them, I never got around to writing the blog post! This indie polish brand is called One Love Lacquers, and can be purchased from Victoria on her Etsy shop at http://www.etsy.com/shop/OneLoveLacquers


The first polish I'll show you is called Mermaid Lagoon.  This polish has pink and black hex glitters, and square blue glitters in a clear base. I love mermaids and I loooved this one when I saw it! In the picture above I have it over Zoya - Gei Gei and OPI - Suzi Says Feng Shui. I have two coats on all my fingers except my pinky, which has one coat. Formula was good. 

This next polish is called Captain Hook. This polish has red and black hex glitters and purple bar glitters. I'm a huge fan of bar glitter, and I love how Victoria put red and purple together, a combination I love but one that isn't very common. I have Captain Hook over Zoya - Julie and OPI - Comet Loves Cupid. All fingers have two coats, pinky has one. Formula was good. 


This last polish is called Grasshopper Pie. As much as I love the other two this one is definitely my favourite! This polish has (I think) matte mint hex glitter (it doesn't sparkle), larger brown hex glitter, and some silver micro glitter. I didn't think I woud like this one as much as I do. I have it over OPI - Gargantuan Green Grape, Orly - Buried Alive, China Glaze - Re-Fresh Mint. All nails have two coats and once again my pinky only has one coat. I think this polish goes PERFECTLY with Re-Fresh Mint! Formula was good. 


XO Natasha

Tuesday, June 18, 2013

Mix 'n' Match: Ruffian & Striping Tape

A ruffian is something I've been wanting to try for a while, and like most things it took me forever to actually do it. I thought just a ruffian would be a little plain, so I decided to do some striping tape on my middle and ring fingers. 


I started with Nail Envy as my base coat, of course. Then I put one coat of NOPI - Positive Energy. It's my absolute favourite silver! I'm on the hunt for more silvers so if you have any suggestions let me know! Next I put two coats of Orly - Tiara on. I love how sparkly this looks! I do it quite often for my friends. 


I did the ruffian on my thumb, first and pinky fingers. The middle and ring fingers got some striping tape designs. The light periwinkle is Pure Ice - Bikini. Now that I see it on, I think it's more of a dusty blue. I wasn't a big fan of this at first, but after a couple hours I really do like it. I wanted a mani that was a palette cleanser of sorts so I chose my new Pure Ice polish. It's very light and I thought it would look great with silver. 


I really like how a ruffian is very simple yet still has a little flare to it. I'll probably do these more often, I need some practice with making the line smooth though! 

XO Natasha 

Friday, June 14, 2013

Taylor Swift: Red Tour

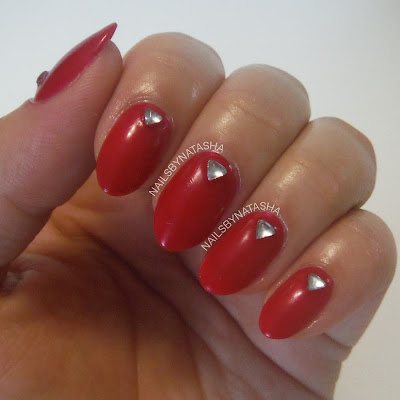
My friends and I are going to see Taylor Swift today! It'll be my first time seeing her, so I'm really excited. I'm also super excited to see Ed Sheeran. Of course, I had to paint my nails RED seeing as that's the name of her tour. I don't have many reds, my favourite is by OPI, called Comet Loves Cupid. I've had it forever and I think it's just a beautiful, classic red. My mom recently bought me another red though, by Essie, called Catwalk. It's got the slightest bit of silver shimmer in it, and it's a little darker and more fuchsia than my OPI red. 

I didn't want to have just plain nails so I decided to add some accents, using my new triangle rhinestones which are plain silver (or clear). I placed one triangle at the base of each of my nails near my cuticles, pointing out so as to accentuate my (sort of) almond nails. As my nails grow out I'm continuing to file them and bring out the almond shape again! 


I really love how this look turned out, and I love my rhinestones. Essie - Catwalk did not photograph correctly on my nails, it's a little darker and more fuchsia IRL. It looks like the photograph of the bottle below. 


Check out these beauties! 


This is a look I want to try out again, with a different colour, and possibly more rhinestones on each nail, or different placements of the rhinestones. 

What are your favourite things to do with rhinestones? 

XO Natasha 

Thursday, June 13, 2013

Reverse Gradient with Bar Glitter

Whenever I come home to visit my mom and sisters I plan out my designs ahead of time so I know what colours to bring with me. I tend to stick to really simple things because there's always so much to do, and so many peoples nails to do I usually don't have time for myself. I figured a glitter gradient was the perfect opportunity to do two things: use an untried and play around with my bar glitter. 

I only have two bar glitters, one of which is about 9 years old from Claire's in England. It reeks and is super gloopy! Plus it takes forever to dry. My other one is by Nicole by OPI, it's called Fabulous is my Middle Name. The other polish I used was a Sephora by OPI. There's no Sephora around me at school so when I was at home about a month and a half ago I decided to spoil myself and purchase a couple. The pink I got is called Seeing Pink Elephants. When I held these two together I knew it was meant to be! 


I'm usually quite good at glitter gradients, but I tend to be less than good when I do reverse gradients. Also I find when I'm sort of rushing it turns out awful. This is why I don't really like my nails as a glitter gradient, but they do look cool. 


When doing glitter gradients, do you prefer a normal gradient or a reverse gradient? 

XO Natasha 

Sunday, June 09, 2013

Pearl Layering

I wanted a mani just for a couple days so I figured I'd try out some layering. I love layering a shimmery translucent pink over a dark blue. This time I layered a semi translucent pearl over a pink colour. The pink colour was Sinful Colors - Folly, the pearl was Rimmel London - Crushed Pearl. 


I loooved Folly, I thought it was absolutely beautiful. It didn't photograph true to it's real colour, but here's a picture anyway. 


I knew I hated it as soon as I put the first drop of Crushed Pearl onto my thumb. I know it doesn't look ugly or anything, but like I said I loved Folly, so I felt this just ruined it. This pearl is a little more opaque than I'd like, but I think it could be really pretty over some other colours! 


XO Natasha 

Friday, June 07, 2013

Mint Ombre


I've always wanted to do an ombre, but I never got around to it because I always wanna try new designs and this is so simple. A lot of people interchange the words gradient and ombre, it's really up to you what you call this but this is what I mean when I say ombre - each nail is a solid colour and on your hand the colours fade from light to dark or dark to light. 


I don't have a full spectrum of shades in one particular colour except mint. The shades are all over the place and it's hard to match tones. I'm really pleased with how this turned out! If I could change one thing it would be the colour of my pointer fingers, I think it didn't transition as nicely as it could have, so I'll have to stay on the hunt for a polish that colour! 


The polishes I used from light to dark were: China Glaze - Re-Fresh Mint, Zoya - Neely, Revlon - Minted, Essie - Turquoise & Caicos, China Glaze - Aquadelic. Minted looks very green in the pictures of the bottle but IRL it's not. 


All polishes only required two coats for full opacity, except Turquoise & Caicos which was three coats. 


I really liked this at first but after a couple days I was starting to hate it. Well, not hate, that's a strong word. I just began to dislike it, a lot. I wanted something new, I was bored. 


What do you do to your ombre mani to jazz it up a bit? Or do you just leave it plain? 

XO Natasha 

Tuesday, June 04, 2013

Orly Glowstick

Hey guys! Today I'm just showing you a polish that I've used before, many times. It's Orly - Glowstick. It's the brightest polish I own! It literally feels like a highlighter, on my nails. Looove it. My best friend also happens to be obsessed with it; I did it on her toes and a week later she wanted her nails to match. 


I recently bought some loose glitter on ebBay. It was around $5 or $6 for 24 small jars of glitter! As soon as I got them I rearranged it all into rainbow order, yes I do realize I have OCD... but I knew I had a super bright glitter that matched Glowstick! 


I started by painting her nails with a base coat of strengthener (of course) then one coat of white. My white is pretty opaque so I only needed one coat. If your white is thinner it's best to do two coats so you have a better background for any neon polishes. Then I did two coats of Glowstick. Usually I do three coats, but today I only needed two. While the second coat was still wet on the middle and ring fingers, I dumped glitter onto those nails and pressed down gently so the glitter stuck to the wet polish. I turned her hand upside down and tapped off most of the excess glitter, but around the cuticles I just brushed the glitter off using a makeup sponge. I topped it off with a thick coat of Seche Vite. The nails with glitter dried textured, which you can leave if you want, but I added another top coat to smooth them out. 

One thing I love about Glowstick is that it glows in the dark! 


We're both really pleased with how these nails turned out! And I'm even more excited to use my glitter! 

What are some of your favourite things to do with loose glitter? 

XO Natasha