Showing posts with label tape. Show all posts

Monday, August 19, 2013

Nail Art August Day 7: Stripes

Around three months ago I purchased my first striping tape. I had a lot of fun making really complicated designs, and I figured that's what I would do for today's post. But typical me, I really wanted to do something different than what the majority of people would do. Instead of making it really complicated, I decided to make it really simple. 


This mani is inspired by my bedroom. It's got a piece of trim in the middle of the walls. I was originally going to use the colours from my room but I decided to try out some new polishes instead! 


Orly - Rage, Essie - Naughty Nautical

Here's a shot of Rage before I put Naughty Nautical on top, isn't she a beauty?! 


And one last shot of my nails! It was hard to get Naughty Nautical to photograph properly, it's a little brighter in person than in the pictures. I used striping tape to create the lines. 


I absolutely love the simplicity of this mani, and I think these two colours look amazing together! 

XO Natasha 

Tuesday, August 13, 2013

Nail Art August Day 5: Cutsey

Alright so when I think of "cutsey" I think of bows. I really wanted to add bows on this mani but I'm awful at drawing them with dotting tools. I have a stamping plate that has a bow on it but I'm no good at placement so it would have turned out messy (I practiced about 1o times and still decided against it!) I still think this mani is really cute the way it is and I'm happy with how it turned out :) 

I began by using binder reinforcements to create half moons. The green/mint polish is Essie - First Timer. This was an untried, and I love it! It dries a little different than the bottle colour, though. It's a little darker and a little more green when dry. 

I used dotting tools for the dots, obviously, and I used a thin brush for the stripes. I'm not happy with my middle finger stripes. I usually begin on my thumb (because you can barely see it so it doesn't matter if I mess up) but for whatever reason I forgot and started on my middle finger. By the time I got to my pinky the stripes were perfect though! 


Here's my mani with the bottle. I'm not sure if you can see the polish colour difference in the bottle vs on my nails. It's very slight.


I never really used to like dots but I'm starting to after this mani and one I did a while ago, my summer floral nails. I've always loved stripes and I'm glad I'm getting better at freehanding them with a brush, it's so much faster than tape!

XO Natasha 

Saturday, August 10, 2013

Nail Art August Day 4: Sparkles

For the "sparkles" challenge I wanted to try something really different... So I went with black! It's not the first colour anyone thinks of when they think sparkles, in fact it's probably the last, but I thought it might look really cool. 

I have a bunch of really fine loose glitter, so I figured I'd use that. I didn't want to just do full nails of glitter, I wanted to be a little more creative. I began by painting my nails black with OPI - Black Onyx. Then I used striping tape to section off parts of my nail where I wanted the glitter. I couldn't decide if I wanted to do vertical lines or chevrons, so I did both! 

I know it's really obvious how edited this photo is, but since this mani was black on black you couldn't see the design in the shade or in the light, so I had to use flash but that resulted in my hand being super bright. 


I think this mani is really cool, but I wanted the glitter to be more obvious than it was. I think if I were to try to do this again I would use glitter that has a bit of silver or some other colour in it so you're able to see it better on the black background. 

Like I said I sectioned off parts of my nail with striping tape and inside the tape is where I put my glitter. Since it's a little jar of glitter I either dipped my whole nail or dumped glitter onto my nail. This resulted with glitter everywhere on my nail and I had a difficult time dusting off the excess. If I were to do this design again I would do full glitter nails then paint on top of the glitter for an easier and cleaner design. 


Overall I really like the combination of chevrons and vertical lines! It's also pretty cool how the loose glitter ends up feeling textured when you've only put one layer of top coat on. I'll probably do this mani again, but use different colours, probably something more contrasting. 

XO Natasha 

Tuesday, July 30, 2013

Sideways Chevrons

I know I've been a little MIA the past two weeks, I was in Florida (at Universal) then I was visiting my mom for a week. She just moved so we're sorting out the house and unpacking! I was only able to paint my nails twice but I got a lot of new polish, you can see the picture on my instagram, @nailsbynatasha

This mani, like my first chevron mani, is inspired by @nailsofjessiek. I love how the slightly sideways placement of the tape just gives the mani a bit of a different look compared to traditional horizontal chevrons. 

Below are the polishes I used to create this look. 

Orly - First Kiss, China Glaze - Seduce Me
I started with three coats of First Kiss. I was going to use saran wrap to sponge some of Seduce Me onto my thumb, pointer, and pinky fingers but I didn't like how it turned out so I covered it with two coats. 


Here is my finished product. I took a couple tries to place the tape properly. At first I had it on a 45 degree angle but I didn't like that so I flattened it out a tad. I used two coats of Seduce Me on top of the tape. I put one top coat on, smoothed it down with a buffer and put another top coat on just so it wasn't super bumpy. 


I like how this is a spin on the classic horizontal chevrons, but I just feel like it's missing something. Like I mentioned earlier I wanted to do saran wrap nails on my thumb, pointer, and pinky fingers but I need more practice. I love the look of a nude and a contrasting colour for the chevrons though! I think this is something I'll do on my mom or one of my sisters soon. 

XO Natasha 

Wednesday, July 10, 2013

First Chevrons

I've always been familiar with pinking shears because my mom loves to sew. It wasn't until I started looking at manicures on Instagram that I realized what you could actually do with tape. I'm not sure whose nails I saw first, but when I think of chevrons, I instantly think of @nailsofjessiek on Instagram. She is the QUEEN of chevrons! Click here to visit her blog. 

I wanted to start out with a really simple chevron so just in case I messed it up, not all of my nails would be ugly. Here's a picture of Jessie's manicure that I recreated. 

Screenshot from Instagram, credit to @nailsofjessiek
Here are my pinking shears, or zig zag scissors. I ordered these from eBay for roughly $7USD. Click here to view the page for them if you would like to purchase some for yourself. The reason I bought these on eBay was because I couldn't find any at Walmart, and I didn't want to bother going to any craft stores because my mom told me they would be expensive. (Who has money these days?! Not me that's for sure!) And being the eBay fanatic that I am, I knew I could find some for a great price! To me, it's worth the wait for cheap items. 


The most important thing when using tape for a mani is your scissors. If they're not sharp, you won't have crisp edges. Also, good quality tape is a must, of course. I use Scotch tape. One tip I learned from reading Jessie's Chevron Tutorial post is that you should double up your tape. This will prevent the tape from ripping as you peel it off. My first attempt at the chevrons was unsuccessful because of this. I also thought the pieces of tape were too big so I cut smaller ones for my second attempt which was successful! Here's the tape on my nail. 


Below are the polishes I used for my mani. 


OPI - Black Onyx, OPI - Alpine Snow, OPI - ElePhantastic Pink, NOPI - The Next CEO, Pure Ice - Bare It All

And here is the finished product! I'm SO happy with how it turned out. I really understand why people are obsessed with Chevrons now. They're just so crisp and unique, your eyes are just really drawn to them. 


I'm really excited to create more chevron manis especially since it's so easy! Once I the hang of cutting the tape everything went so fast. 

XO Natasha 

Thursday, April 11, 2013

Chevrons & Bows


This is my second manicure for #bluenailsforautism. I was inspired by my phone case. It's a very light blue with a pink bow in the corner. I thought this was a perfect opportunity to use one of my new polishes, Essie - Bikini So Teeny as well as China Glaze - Fairy Dust. 


From what I've seen in pictures, sometimes Fairy Dust ruins a beautiful manicure. I didn't want the glitter to be too dominant, I wanted the focus to be on the blue chevrons and the bows. To do this I jelly sandwiched Fairy Dust between two coats of OPI - Bubble Bath. Compared to Essie - Sugar Daddy this polish is a tad more opaque, and it's more of a taupe than a pink. It's hard to see Fairy Dust in these pictures but you can definitely see it in person and I think it's very pretty. 

Bikini So Teeny is a gorgeous colour, although I think the formula is pretty thick for Essie. It's got a very slight shimmer to it so it's not just a plain creme. The stickers I used are from Konad. I was originally going to try doing the bows myself before I remembered I had these stickers. They saved me because I'm terrible at bows! 

This picture is what Bikini So Teeny looks like IRL. 


You can see Fairy Dust a little better in this picture and there's the bottle in the background! 


Here are my nails with my phone case... This photo was really hard to take cause I was too lazy to get my camera out or ask to borrow one of my friend's phones. I know Bikini So Teeny doesn't actually match the case (Sally Hansen - Barracuda is probably an almost perfect match) but I still think it's really pretty! 


Do you think chevrons look okay on my almond shaped nails? At first I was really iffy but now I think I really like it. They make my nails look way longer!

XO Natasha 

Thursday, February 07, 2013

NOTD: Flat Half Moons

So I just wanted to do a simple mani and use these two colours together since I tried to for my water marble but it didn't work out... Kaitlin from The Daily Polish was my inspiration! She did a "flat" half moon mani and I thought it looked really cool. It's a nice twist on the classic half moon mani, and I figured since my nails are round, a straight horizontal line would look cool. 

It's definitely different, but I think it suits square tips much better than round tips. I apologize for my messed up first finger, I was getting restless while waiting for the polish to dry and bumped it :( 


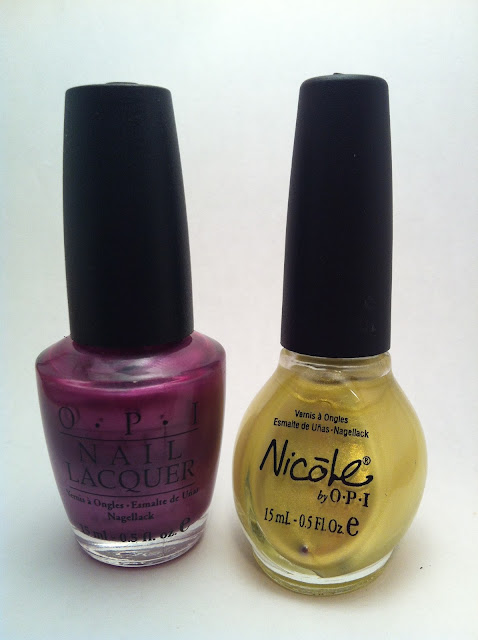
Here are the colours I used: OPI - 3 Plums, I Win! and NOPI - Lemon-Lime Twist. I've had them both for about 4 years and I barely use them, and I thought they looked really nice together! 


Saturday, January 05, 2013

Some Previous Designs

I apologize in advance for the possibly terrible quality of the pictures, the point is to show you some of my designs, not how awful I am at photographing. Enjoy!