Showing posts with label gradient. Show all posts

Thursday, August 01, 2013

Nail Art August Day 1: Gradient

After my two weeks of doing nothing I've been kind of unmotivated to do any nail art, so the Nail Art August challenge by @californails on Instagram came just in time! I was actually planning on doing a gradient, and like I said August came at the perfect time. 

As you can see from this post's title, the theme for August 1st was a gradient. I really love how sideways gradients look and I figured I'd use two pretty bold colours. I chose two of my newer polishes, both from China Glaze's Sunsational collection. I used Fairy Dust on top, of course. 

China Glaze - Too Yacht To Handle, That's Shore Bright, Fairy Dust


I'm not sure what to call this look, but on every nail I like switching the direction of the gradient so it looks like the two colours switch back and forth between nails. It only takes a little more effort and I really like how it looks! 

I just paint polish onto a slightly saturated makeup sponge and sponge the polish onto my nail. I find three coats is usually enough to make the polish opaque. I usually use a fine sponge but this time I used one that wasn't as fine. A lot of girls have said it makes the polishes blend together better, and I thought that would be useful considering I was using two contrasting colours. With such big holes though I found the sponge a bit harder to control. My middle finger didn't turn out quite as good as the others; my ring finger is my favourite. 


I know it's only the first day but I'm really glad I'm doing this challenge! Sometimes I just need a little help when it coms to nail art and deciding what to do haha! 

XO Natasha 

Saturday, July 06, 2013

Classy Glitter Gradient

If you read my posts or follow me on Instagram you'll know I really looove glitter gradients. Why? They're just so much quicker and easier to do than blending two colours together. It's a little tricky to master a glitter gradient because most people tend to go overboard. By that I mean too much glitter (yes, in this case, there is such a thing as too much glitter!). It just doesn't blend properly so you end up with basically two chunks of colour. Well, colour and glitter. 

I recently purchased OPI - Which is Witch? and it is SO beautiful I just had to force myself to use it. I tend to try to "preserve" or "save" pretty polishes... weird I know. I wanted to incorporate another untried so I figured I'd go with Essie - Bahama Mama to achieve a more elegant or classy look. It's not very summery, but it sure is pretty! I've never really been one to wear season appropriate manis anyway. 

Essie - Bahama Mama, OPI - Which is Witch?


I used three coats of Bahama Mama for full opacity. Not sure why my pointer finger looks darker, but this is without top coat. It's more purple in the light and fairly dark IRL. 


And here's the glitter gradient using Which is Witch?. I really love how this turned out! I'm even thinking of using this same glitter for my next mani! I don't remember the last time I did the same thing or used the same polish two manis in a row... 


I also really wanna try this in a jelly sandwich. I don't want to cover up all the beautiful holo but the glitter is so unique - hex, bar and micro - that I think it would look amazing! 

XO Natasha 

Friday, July 05, 2013

Sideways Neon Gradient

I always have a hard time deciding what to do on my nails, but I was scrolling through Instagram and was reminded of a beautiful gradient @sparrownails did a while ago. It was a sideways gradient using a light blue and a light purple, topped off with fairy dust. I wanted something a little brighter, so I chose two neons.


China Glaze - Pool Party, China Glaze - Orange Knockout, China Glaze - Fairy Dust
I sponged 2-3 coats of polish over two coats of white polish. My camera doesn't like neons too much, so I used my phone for the last picture. The colours don't look as bright on my phone but you can see the colour better. 


I really like how fairy dust ties a gradient together - it kind of blends it and hides any imperfections from sponging! Sorry for the messiness and shrinkage around my cuticles, I'm sure if you own China Glaze polishes and Seche Vite you know these two aren't best friends. 

There are a lot of different ways to do a gradient using a sponge, but I've found my method works quite well. I get the sponge wet first so the polish doesn't absorb too far into it. Then I paint polish onto the sponge and sponge my nails. I find sponging requires 3-4 coats to really be opaque. I know it uses a lot of polish but the results are so pretty :) If I'm doing a bit of a lighter gradient, or only sponging one colour as opposed to two or three, I put dabs of polish on a piece of glass and dab that with the sponge. 

XO Natasha 

Thursday, June 13, 2013

Reverse Gradient with Bar Glitter

Whenever I come home to visit my mom and sisters I plan out my designs ahead of time so I know what colours to bring with me. I tend to stick to really simple things because there's always so much to do, and so many peoples nails to do I usually don't have time for myself. I figured a glitter gradient was the perfect opportunity to do two things: use an untried and play around with my bar glitter. 

I only have two bar glitters, one of which is about 9 years old from Claire's in England. It reeks and is super gloopy! Plus it takes forever to dry. My other one is by Nicole by OPI, it's called Fabulous is my Middle Name. The other polish I used was a Sephora by OPI. There's no Sephora around me at school so when I was at home about a month and a half ago I decided to spoil myself and purchase a couple. The pink I got is called Seeing Pink Elephants. When I held these two together I knew it was meant to be! 


I'm usually quite good at glitter gradients, but I tend to be less than good when I do reverse gradients. Also I find when I'm sort of rushing it turns out awful. This is why I don't really like my nails as a glitter gradient, but they do look cool. 


When doing glitter gradients, do you prefer a normal gradient or a reverse gradient? 

XO Natasha 

Wednesday, May 22, 2013

Gradient + Watermarble

This is my billionth attempt with watermarble and I'm finally pleased with how it turned out! Minus the bubbles on my middle finger :( I also took the opportunity to try out my acrylic paint and do a gradient. It's very subtle, I wanted the main focus to be the watermarble. I'm really pleased with how this mani turned out! 


I really like how easy the acrylic paint was to work with, but nail polish definitely lasts longer. I used seche vite on top and the paint started crackling underneath, but then it settled down. It's still slightly textured with two top coats. Clean up was a little weird as well. Acetone does remove the paint but it sort of peels, as opposed to nail polish just dissolving. Also, as I was doing dishes today the tips got some wear so my two pointer fingers are now chipped. 

I'd like to try a watermarble over a gradient, or a gradient watermarble next. I'm still a little undecided with whether I like wearing watermarble or not. It's pretty but it's a lot of work and it's hard to control the design sometimes. 

What are your favourite gradient or watermarble designs? Do you like combining them? 

XO Natasha 

Saturday, March 09, 2013

Weaved Lines & Gradient

You may have noticed it's been quite a while since I've done some real nail art, so I figured hey, it's Saturday, I should do something cool with my nails! (I was supposed to be studying today but instead I did my nails and cleaned my room... still fairly productive I think!) 


I'm gonna call this look weaved lines.Iit's kind of like doing a braid on your nails but instead of using different colours you just use lines overtop of a base colour. I've been seeing this a lot on Instagram lately, and I have a couple pictures in my phone with this look as well. It seemed simple enough so I figured I'd give it a try! 

I also wanted to practice my gradient technique since I've tried a couple times with very little luck. I figured it if turned out terrible the lines would cover it up. I used two pinks to do my gradient and it's very subtle, and even more subtle in the pictures so for that I apologize. It turned out really good though! I'm very pleased and for my next mani I'll probably do a gradient on all my nails. It's time consuming and uses more polish than most designs but it's a really pretty look! I'll be posing a tutorial soon, or maybe I'll make a video, just with my own tips because it took me a couple tries to get a decent look so I'd like to share how I did it! 

The grey I used is Orly - Decoded. The darker pink is Orly - Cotton Candy, and the lighter pink is Maybelline Color Show - Born With It. I used Seche Vite for the top coat. I just got my Seche Vite a week ago and I love it! It dries so fast and leaves your nails so shiny. 


I know my lines aren't straight and aren't the same size... for some reason I was really shaky today although I'm usually very still! I really like this look but next time I think I'll try doing more of a weave as opposed to the top part being "weaved" and the bottom just with vertical lines. 

XO Natasha 

Saturday, February 16, 2013

Manicures for Friends!


My friends are pretty damn lucky that they have me to constantly keep their nails pretty... 

I did this for one of my friends. She LOVES glitter and couldn't stop staring at her nails! I used her silver CND Shellac polish as the base and put China Glaze - Nova on top. It worked well for a couple days... but since polish and shellac don't really work together too well it peeled a bit on a couple fingers. Nova was great to work with at first but like all heavy glitter polishes, it got super thick fairly quick.


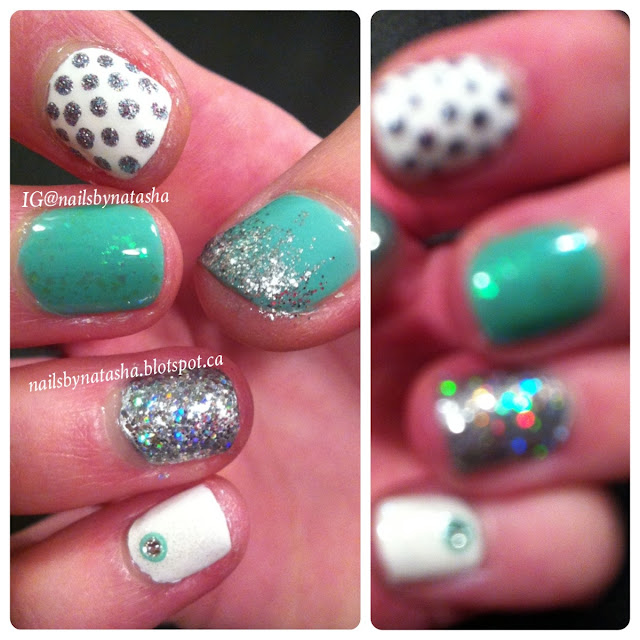
This was done for my other friend. It's a nice way to jazz up a plain skittle mani! The teal colour used was Essie - Turquoise & Caicos. I used this for the thumb and middle finger, and dot on the pinky. The white on the first finger and pinky is a random brand from a random store. It has great coverage which I really like cause that's sometimes hard to find with whites! The base on the ring finger is NOPI - Positive Energy. For the thumb, the glitter gradient was created using Orly - Tiara. The dots on the pointer finger are NOPI - Look At Me, Look At Me. On the middle finger, there's some subtle holographic flakies, Zoya - Opal. The glitter on the ring finger is CG - Nova, I used two coats. The dot on the pinky, like I said, was the Essie polish, and then I placed a 1.5mm rhinestone (purchased on eBay) in the centre.

Friday, February 01, 2013

Untried Polish: China Glaze - Pink Voltage

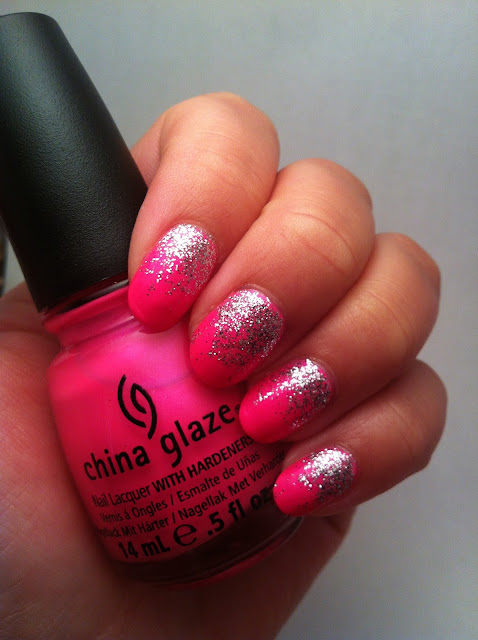
I was looking for the non-neon version of this polish for so long before I finally found it. I got it in a 3-pack from Nail Polish Canada. It came with Towel Boy Toy and Nova. It's just a classic bright pink, with a bit of pink shimmer. Although it's not neon, it's extremely hard to photograph, like most neons are. I tried my best with the pictures below, but they still aren't the true colour. I also added a reverse glitter gradient in Orly - Tiara. This is my first reverse glitter gradient, and I do like it, but it was a little difficult around the cuticles - you'll notice a pink area between sparkles and cuticle. 


These are the two colours I used for my simple mani.
China Glaze - Pink Voltage, Orly - Tiara

Application for this polish was fairly good. I used 3 coats to achieve full opacity. As with most CG's, the polish got a bit thicker and a little harder to work with after being open for a bit, but nothing that a cleanup didn't fix. Overall, this polish is very nice. I would love to use it on my toes! I must say though, I really do NOT like CG brushes! My favourites are the wide brushes with rounded ends, and the OPI ProWide brush. 

Saturday, January 05, 2013

Some Previous Designs

I apologize in advance for the possibly terrible quality of the pictures, the point is to show you some of my designs, not how awful I am at photographing. Enjoy!